As we near the Christmas season, many of us will find it hard to get a gift for people like Grandma (who already has everything) or redneck uncle Randy (who’s kind of scary) or artsy best friend Danielle (who is exceptional at everything), but oftentimes, the best gift to give is one from the heart. With quick and easy crafts, gift giving is simple. I have searched all over (Pinterest) to find these awesome crafts for anyone who has half an hour to spend.
Christmas Tree Mason Jar
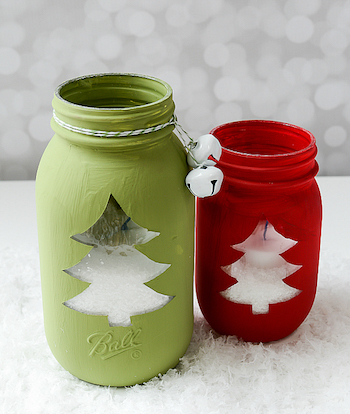 The first craft that I found that would be a great idea is Christmas Tree Mason Jars. These are fun and simple and only require a few things: Mason (or Ball) glass jars, paintbrushes, chalky paint (the example used red and green), painters tape, Epsom salt, scissors, and a Christmas tree stencil. Baker’s twine and white jingle bells are optional.
First, overlap three or four layers of painters tape and trace a Christmas tree stencil onto the jars. Cut out the tape Christmas tree, and align it on the jars. I would recommend using a credit card to make sure the edges are on there well enough so that paint doesn’t get under the tape where it would look sloppy. The best thing about chalky finish paint is that it dries quickly and looks professional with one, clean coat. After the paint has dried, peel off the tape and add in your Epsom salt (as snow) and a tea light on top. Then, if you so choose, tie your twine around the top and attach it to the white jingle bells.
Festive Ornament
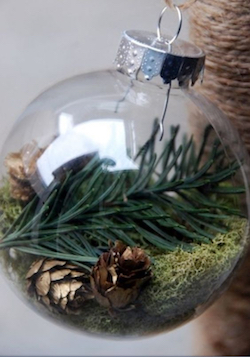
The next craft is making your own ornament. We all remember ornaments we made in grade school where we just filled the clear baubles with confetti and wrote “Merry Christmas” in our third grade, crooked handwriting on the side, but this takes it to a whole other level – for half the effort. You will need a clear ornament, fake moss, very small fake baby pine cones, and some form of fake pine cuttings (artificial plants will last longer than real ones).
This craft is super simple, because all you need to do is take off the top of the ornament, carefully stuff in the fake moss and make sure it looks good before placing the baby pine cones inside, followed by one pine cutting. If you want it all to stay together, I would apply some hot glue at the bottom of the ornament to hold in the moss, to the pine cones to hold them to the moss, and to the top of the ornament cover to hold the pine cutting in an upright position. If you don’t glue it, it will all move around when the ornament is shaken.
Pine Cone Garland
The final craft that I thought would be a great gift idea for this Christmas season is a pine cone garland. What better to bring Christmas than with the trademark smell of pine in your home? This craft only requires pine cones, white paint (or gold paint and glitter), and yarn. Small hooks are optional.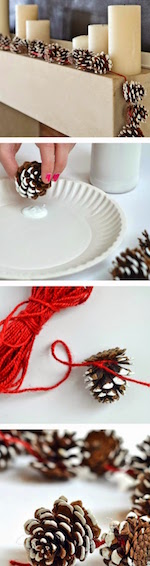
First, you need to clean the pine cones. If these are pine cones you have picked up off of your front yard, they are most likely to be full of sap. One option to rid the pine cones of sticky sap is to preheat the oven to 200 ℉ and line a cookie sheet with aluminum foil. Place your pine cones on the sheet in a single layer and place in the oven for 30 minutes or until the sap has melted and the pine cones have opened. Otherwise, you could wash them in a sink full of water and with ½ or 1 cup of vinegar. Let them soak for 20 to 30 minutes and make sure all the sap has been washed away. This will get rid of any bugs living in the pine cones as well. Lay down several layers of newspapers that you can set the pine cones on to air dry. Rinse the pine cones with clean, lukewarm water and lay in a single layer, letting dry for 3 or 4 days. If, however, you bought the pine cones from the store, you can avoid all this completely.
I have seen this craft done two different ways. The first is painting the cones gold and then putting white or silver glitter on the lower part, making it fade as you go up. The second is just rolling the pine cones on a paper plate with a little bit of white paint on it and letting it dry. I have seen people using an awl to punch a hole in the top where the stem is, place a small hook in the hole created, and then hot glue it but this is optional as it calls for a lot more effort and time.
After the paint has dried, unroll a long strand of yarn (for however many pine cones you are using; I would use 8 inches for every pine cone), and cut it at the length desired. Start by tying the yarn in a double or triple knot around the middle your first pine cone about four inches from the edge. Repeat, with about four inches from each pine cone to the next. After you have tied all of your pine cones to the yarn strand, cut off the ends of the yarn.
Imagine grandma’s face when she sees the painted Mason jars you made her, Danielle’s expression when she sees the cool ornament for her handmade Christmas “tree,” and Uncle Randy’s amazement at the pine cone garland for his “man cave.” These simple gifts are for the most basic of DIY-ers and are super fun to make as well. In this Christmas season, gift giving doesn’t need to be hard but can still make everyone on your list happy.